
Last fall I took my first stab at trichromy or the three-colour process.
I first saw this process done by Russian photographer, Sergey Prokudin-Gorskii, in the early 1900s.
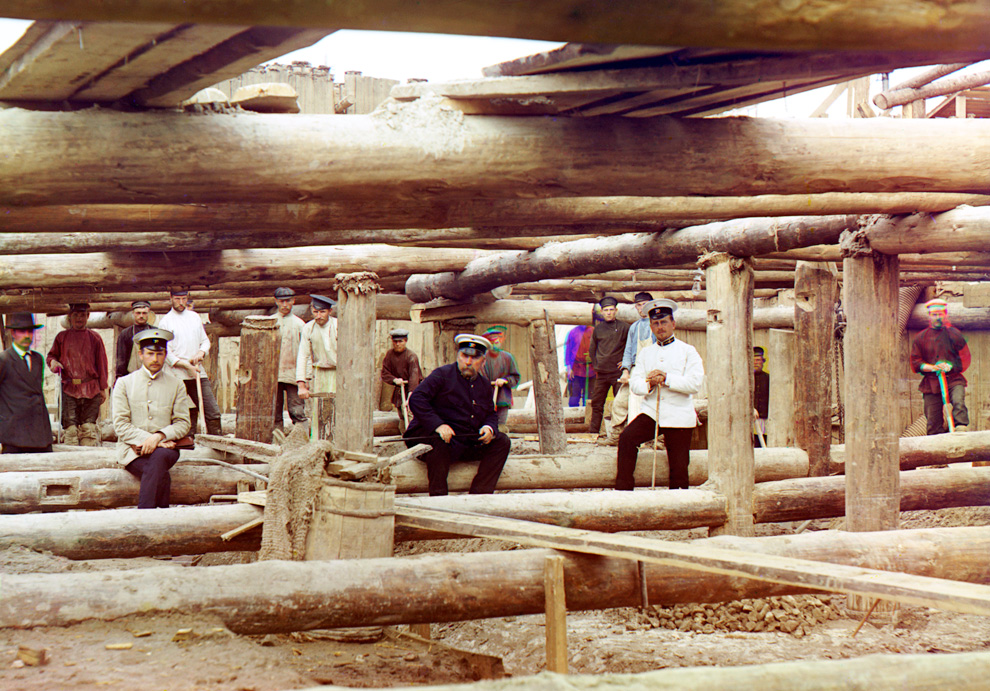
Trichromy is a process of creating a colour image using black and white film and colour filters, typically red, green and blue. In order to achieve a colour image from black and white film, you would take three images without any movement of the camera or subject. Each of those three images is taken with a colour filter. Afterwards the three negatives would be projected through colour filters to create one colour image.
We are lucky enough now, that we can use photoshop, instead of projecting the images.
I will show you, using one of my photos, how I combined the three images in photoshop. It was hard for me to figure it out at first, and a lot of tutorials gave very strange ways of doing it, or decided to skip the whole photoshop step.
I used movement in my photographs by purposely not keeping the subject still because I liked the effect.
(This produces a really neat effect when photographing moving water, or trees blowing in the wind).
Trichromy Photoshop Tutorial:
I used the photography studio at my university as my location and my friends as subject. I used a black backdrop, mostly to get a more dramatic effect from the colours.
For each image I had my subject do a series of three movements or poses that I visualized to be one final image. If you are simply taking still colour images, make sure you subject stays very still while you are switching filters.
For this particular image, my subject was doing barrel turns with the veil, and for each colour filter, I tried to catch her at a different point in the barrel turn.
While photographing, I kept a sheet of paper to list the photos I had taken and what colour filter I used, so that when I was scanning and editing it would be easy to tell which should go to which channel. And I tried to keep using the filters in the same order to make it easier to figure out after.
One thing about using colour filters is that they block light. I was using a handheld light metre, which means I had to account for the filters after taking my reading. This website explains how to use filters and adjust your exposure for them.
I did not do the greatest job with this, and I would do a bit more research next time. It didn’t totally hurt my final images because of the movement in the photos, but my green images where always underexposed. If I had taken still images, this would have made the colours not turn out right when photoshopped together. So, remember to make sure you are adjusting for your filters, or use your light metre in your camera with the filter on.
I typically tried each image or pose twice, so I would take six photos, two with each filter for each final image, and bracket my exposures.
I would suggest doing even more than six, especially if you are shooting digitally.
After I developed and scanned the film, I ended up with photos that looked like this.
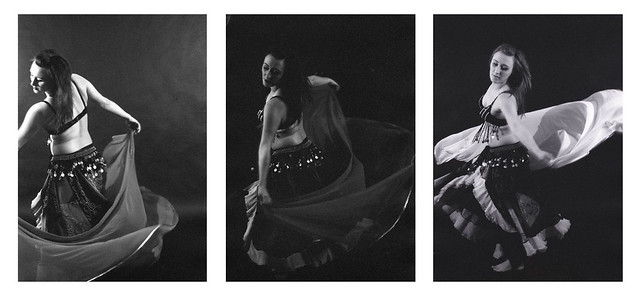
As you can see, the one in the middle with the green filter is under exposed.
I opened each filtered image in photoshop and did a bit of colour correcting to fix the exposure. And spot toned out the dust and such.
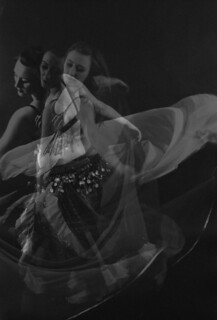
Then I moved the images around until the three were layered the way I wanted. If you are doing still images, you want to make sure that each image is lined up perfectly.
I then cropped the whole image to get rid of the edges and get the composition I wanted.
I then I selected the whole image and copied to my clipboard.
After I opened a new blank image (in the size option it gave me, the size that was copied on my clipboard).
This is the part that took me forever to figure out.
I copied each layer and pasted them into their respective colour channels. See below:

Select the colour channel of the filtered image you are pasting and then paste it onto the channel.
Do this for each colour.
And that’s all there is to it!
If you’d like to see more examples of trichromy, check out this Flickr group.
Follow Me!
Facebook | Twitter | Pinterest | Instagram | Bloglovin’ | Google+ | Etsy